Intro and Brief Recap
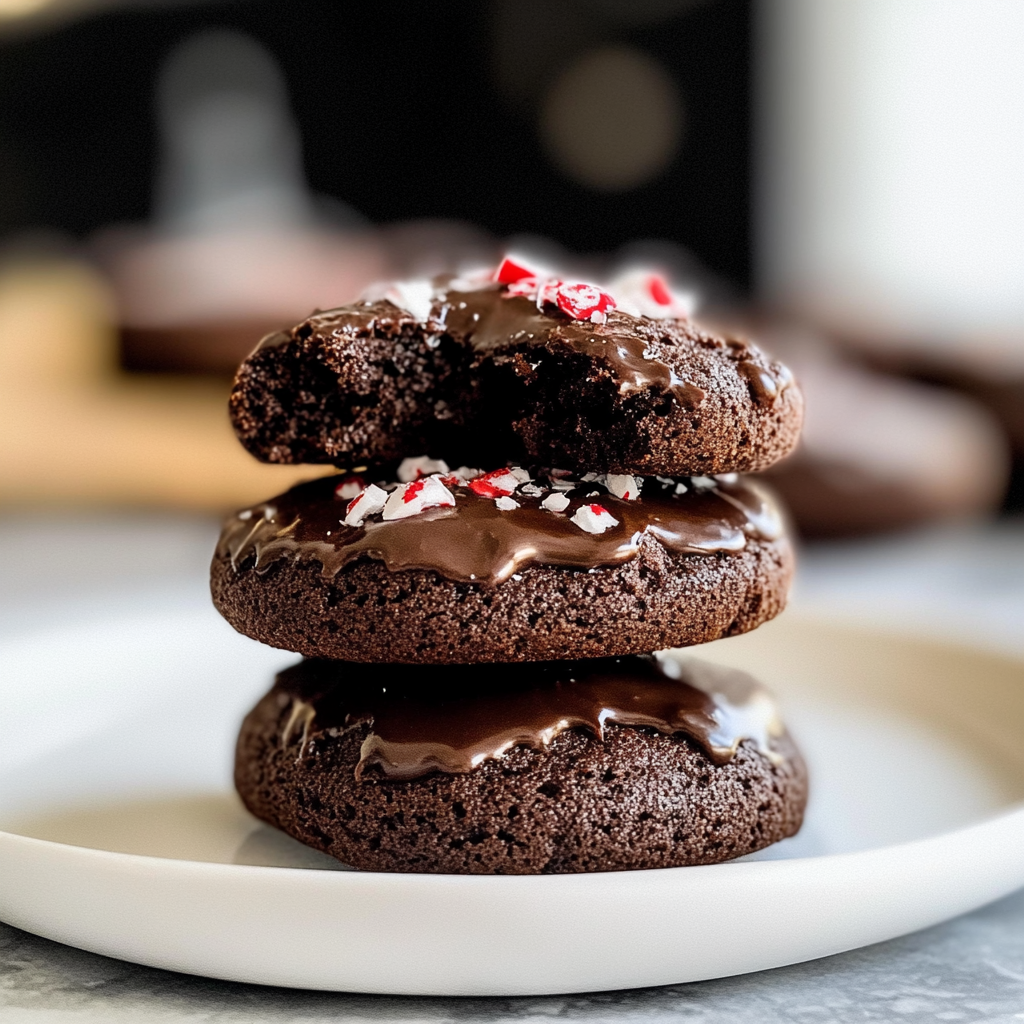
Have you ever tasted a cookie that perfectly combines the richness of chocolate with the refreshing zing of peppermint? Chocolate Peppermint Thumbprints are that perfect treat, offering a delightful blend of flavors and textures. With each bite, you experience the melt-in-your-mouth sensation of the buttery cookie complemented by a luscious chocolate center and a hint of festive peppermint.
These cookies are not only delicious but also visually appealing, making them ideal for holiday gatherings or cozy nights in. Whether you’re hosting a festive party or simply indulging in some self-care with a sweet snack, these Chocolate Peppermint Thumbprints will elevate any occasion. The aroma of baking chocolate mingled with peppermint will fill your home, creating an inviting atmosphere that beckons everyone to the kitchen.
Key Ingredients For Chocolate Peppermint Thumbprints | Sally’s Baking Addiction
Here’s what you’ll need to make this delicious dish:
- All-Purpose Flour: This forms the base of your cookies, providing structure and texture.
- Cocoa Powder: Choose high-quality unsweetened cocoa powder for deep chocolate flavor.
- Unsalted Butter: Softened butter adds richness to the dough and helps achieve a tender texture.
- Sugar: Granulated sugar sweetens the cookies and contributes to their delightful crunch.
- Egg Yolk: Using just the yolk adds moisture and richness without making the dough too wet.
- Peppermint Extract: A few drops of this extract provide that signature minty flavor that complements chocolate beautifully.
- Chocolate Chips: Semi-sweet or dark chocolate chips create a decadent filling that melts perfectly in the thumbprint center.
The full ingredients list, including measurements, is provided in the recipe card directly below.
Instructions For Chocolate Peppermint Thumbprints | Sally’s Baking Addiction
Follow these simple steps to prepare this delicious dish:
First Step: Preheat Your Oven
Preheat your oven to 350°F (175°C). Line two baking sheets with parchment paper for easy cleanup and even baking.
Second Step: Make the Dough
In a large mixing bowl, cream together softened butter and sugar until light and fluffy. Add in the egg yolk and peppermint extract, mixing until well combined. Gradually incorporate all-purpose flour and cocoa powder until just combined.
Third Step: Shape the Cookies
Scoop out tablespoon-sized portions of dough and roll them into balls. Place them on the prepared baking sheets, leaving space between each ball. Use your thumb or the back of a spoon to create an indentation in each cookie.
Fourth Step: Bake
Bake in your preheated oven for about 10-12 minutes or until set but still soft. Allow them to cool on the baking sheets for a few minutes before transferring them to wire racks to cool completely.
Fifth Step: Fill with Chocolate
While cooling, melt your chocolate chips in a microwave-safe bowl at short intervals, stirring until smooth. Once cooled, fill each thumbprint with melted chocolate.
Transfer to plates and enjoy these delightful Chocolate Peppermint Thumbprints as an exquisite treat!

Expert Tips
Here are some helpful tips to ensure the best results for your dish:
- Chill Your Dough: If your dough feels too soft to handle, chill it in the refrigerator for about 30 minutes before shaping.
- Add Extra Flavor: For a stronger peppermint taste, consider adding crushed peppermint candies on top of the melted chocolate.
- Store Properly: Keep leftover cookies in an airtight container at room temperature for up to one week for maximum freshness.
Presentation Ideas
This Chocolate Peppermint Thumbprints | Sally’s Baking Addiction is versatile and pairs wonderfully with:
- A Festive Platter: Arrange the thumbprints on a beautiful holiday platter, surrounded by fresh mint leaves and chocolate shavings for an elegant display.
- Gift Boxes: Package the cookies in decorative boxes lined with parchment paper. This makes a great homemade gift for friends and family during the festive season.
- Cookie Jars: Fill a clear glass jar with the thumbprints, tied with a ribbon. This simple presentation adds charm to your kitchen counter or dining table.
Storage Tips
To keep your Chocolate Peppermint Thumbprints fresh, store them in an airtight container at room temperature. They will last up to one week. You can also freeze them for longer storage; just ensure they are well-wrapped to prevent freezer burn. Thaw them at room temperature when you’re ready to enjoy.
Baking Tips
For perfect Chocolate Peppermint Thumbprints | Sally’s Baking Addiction, consider these tips:
– Use high-quality chocolate for melting to enhance the flavor.
– Make sure your dough is chilled before baking; this helps maintain their shape.
– If you prefer a softer texture, don’t overbake the cookies. They should be slightly soft when taken out of the oven.
Variations to Try
Feel free to get creative with your Chocolate Peppermint Thumbprints! You can substitute the peppermint extract with other flavors like almond or vanilla for a unique twist. Adding crushed candy canes on top of the chocolate drizzle can also provide extra crunch and flavor.
FAQs
Can I make Chocolate Peppermint Thumbprints ahead of time?
Absolutely! You can prepare the dough in advance and refrigerate it for up to three days before baking. This allows the flavors to meld together beautifully. After baking, these cookies can be stored at room temperature in an airtight container or frozen for future enjoyment.
What chocolate should I use for these thumbprints?
For the best results, use high-quality semi-sweet or dark chocolate chips. These chocolates melt smoothly and provide rich flavors that complement the peppermint perfectly. Avoid using baking chocolate that contains less cocoa content, as it may not yield satisfying results.
Can I use white chocolate instead?
Yes! White chocolate offers a unique taste and pairs well with peppermint. If you decide to use white chocolate, consider adding a few drops of food coloring or crushed candy canes on top for added festivity and visual appeal.
How do I prevent my cookies from spreading too much?
To prevent spreading, chill your dough before baking. Additionally, ensure that you measure your flour accurately; too little flour can cause cookies to spread excessively during baking. Using parchment paper on your baking sheets also helps keep their shape intact while they bake.
Chocolate Peppermint Thumbprints

Chocolate Peppermint Thumbprints are a delightful holiday treat that perfectly marries rich chocolate with refreshing peppermint. These cookies feature a buttery base and a gooey chocolate center, creating a melt-in-your-mouth experience. Ideal for festive gatherings or cozy nights, the inviting aroma of baking chocolate and peppermint will make your kitchen feel like a winter wonderland. Bake up a batch to share or keep them all for yourself!
- Prep Time: 15 minutes
- Cook Time: 12 minutes
- Total Time: 27 minutes
- Yield: Approximately 18 cookies 1x
- Category: Dessert
- Method: Baking
- Cuisine: American
Ingredients
- 1 cup all-purpose flour
- 1/3 cup unsweetened cocoa powder
- 1/2 cup unsalted butter, softened
- 1/2 cup granulated sugar
- 1 egg yolk
- 1 tsp peppermint extract
- 1/2 cup semi-sweet chocolate chips
Instructions
- Preheat your oven to 350°F (175°C) and line two baking sheets with parchment paper.
- In a large bowl, cream together softened butter and sugar until light and fluffy. Mix in the egg yolk and peppermint extract.
- Gradually add flour and cocoa powder, mixing until combined.
- Scoop tablespoon-sized portions of dough into balls and place them on the prepared baking sheets, making an indentation in each with your thumb.
- Bake for 10-12 minutes until set but soft. Cool on sheets for a few minutes before transferring to wire racks.
- While cooling, melt chocolate chips in the microwave until smooth, then fill each thumbprint with melted chocolate.
Nutrition
- Serving Size: 1 serving
- Calories: 100
- Sugar: 7g
- Sodium: 45mg
- Fat: 5g
- Saturated Fat: 3g
- Unsaturated Fat: 1g
- Trans Fat: 0g
- Carbohydrates: 12g
- Fiber: 1g
- Protein: 1g
- Cholesterol: 15mg